In the past couple of posts I’ve outlined our environment and our goals/requirements for an on-premises Image Pipeline process. I then went through setting up vSphere JSON Persistent Content Libraries to a single datastore for faster item sharing across multiple vCenter servers.
In this post, I’ll go over the Image Build process itself. I’m not going to regurgitate intro posts of the tools we’re using. As stated before, this chain will take the basics to the next level but I will link to other posts on how to get started.
This time we will focus on the left side of the diagram below in the original post.

Orchestration:
We needed to orchestrate all of the automated pieces of the process that were written buy multiple people on our team. All of these steps are being stored in our local GitHub server using standard Dev processes for small change commits. We already have Jenkins running with the Git plug-in installed for Dev teams so it was a no-brainer to use the same tool.
There’s a bunch of posts on how to install Jenkins and integrate it with GitHub that you can follow for this setup. It also has a great tutorial on how to use build commands to get you going. If you want to do this in your lab, this post is great for running Jenkins and Gitlab via Docker containers.
Within our configuration, we utilize the Pipeline section and store our Jenkins script within GitHub as well. We have this setup to run every Tuesday automatically and can manually run it if there’s a special patch release that needs to get out right away.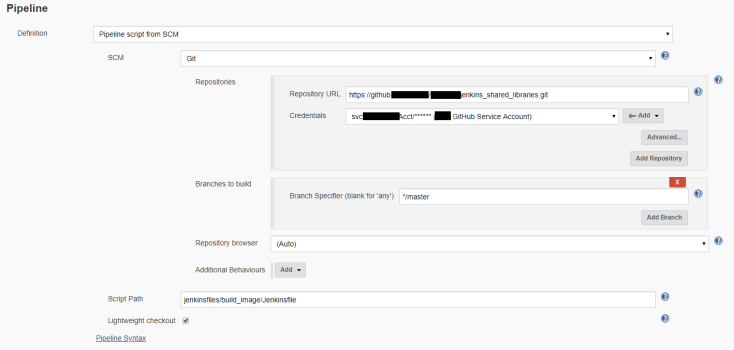
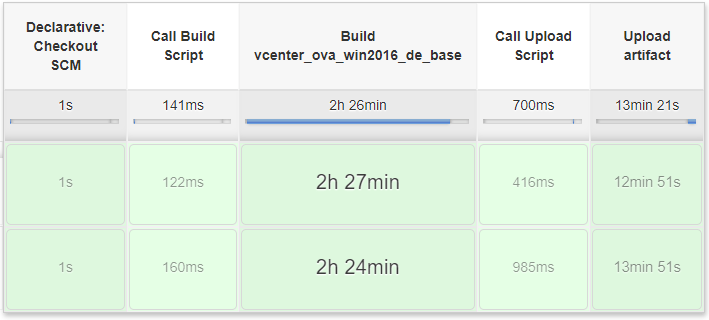
The Jenkins job four building base OS images only has five stages. Declarative (get code and environment variables from GitHub), Call Build Script, laying down the OS along with patching/customization, call upload to Artifactory script, and then the upload process to Artifactory. As you can see, this takes a little over 2.5 hours to complete. You’ll see why when we look at all the provisioning steps Packer is completing.
OS Build:
For building the OS itself, we decided to utilize Packer. The basics for this have been covered in many blog posts (here and here) so I won’t go over that here. What I did want to mention is what needs to be done during this process so VM’s can be customized and properly deployed once in a Content Library.
In older versions of Windows Server you can slipstream all your patches into a new ISO and have them all run at initial installation. Microsoft is now releasing only a couple ISO per year so patching TAKES FOR EVER. Also, it takes multiple reboots.
Within the provisioners section of the Packer JSON config file for the build, this can be accomplished by writing a PowerShell script to run Windows Updates, then rebooting, and repeat a couple times until all patches are installed.
Below is our Provisioners section with the multiple PowerShell scripts we run once the OS is up. As you can see we reboot FIVE times to complete all config and install items necessary.
"provisioners": [
    {
      "type": "powershell",
      "scripts": [
        "scripts/vmware-packer-startup.ps1"
      ],
      "elevated_user": "packer",
      "elevated_password": "packer"
    },
    {
      "type": "windows-restart",
      "restart_timeout": "120m"
    },
    {
      "type": "powershell",
      "scripts": [
        "scripts/vmware-packer-windows-update.ps1"
      ],
      "elevated_user": "packer",
      "elevated_password": "packer"
    },
    {
      "type": "windows-restart",
      "restart_timeout": "120m"
    },
    {
      "type": "powershell",
      "scripts": [
        "scripts/vmware-packer-windows-update.ps1"
      ],
      "elevated_user": "packer",
      "elevated_password": "packer"
    },
    {
      "type": "windows-restart",
      "restart_timeout": "120m"
    },
    {
      "type": "powershell",
      "scripts": [
        "scripts/vmware-packer-windows-update.ps1"
      ],
      "elevated_user": "packer",
      "elevated_password": "packer"
    },
    {
      "type": "windows-restart",
      "restart_timeout": "120m"
    },
    {
      "type": "powershell",
      "scripts": [
        "scripts/vmware-packer-os-optimization.ps1"
      ],
      "elevated_user": "packer",
      "elevated_password": "packer"
    },
    {
      "type": "windows-restart",
      "restart_timeout": "120m"
    },
    {
      "type": "powershell",
      "scripts": [
        "scripts/vmware-packer-finish.ps1"
      ],
      "elevated_user": "packer",
      "elevated_password": "packer"
    },
    {
      "type": "file",
      "source": "scripts/setupcomplete.cmd",
      "destination": "c:/Windows/Setup/scripts/setupcomplete.cmd"
    },
    {
      "type": "file",
      "source": "scripts/cs-vm-customization.ps1",
      "destination": "c:/Windows/Setup/scripts/cs-vm-customization.ps1"
    },
    {
      "type": "file",
      "source": "answer_files/2016/cwxsysprep.xml",
      "destination": "c:/windows/setup/cwxsysprep.xml"
    }
  ],
One thing we liked/disliked about this process is that you cannot use Customization Specifications when deploying VM’s from a Content Library Template item. In a way, this is nice as Customization Specifications were a pain to manage across almost 40 vCenter Servers.
We still needed a way to set hostname, IP info, and DNS though. In came another post from William Lam on how to do this when doing Instant Clones. After reviewing his awesome post, we modified and added the cs-vm-customization.ps1 script above to the c:/Windows/Setup/scripts/ directory so it runs during Sysprep time. Below is an example of how to pull those
  #Adapter Query
$EthernetInterfaceAliasName = Get-NetIPConfiguration | Where-Object { $_.InterfaceDescription -like "*vmxnet3 Ethernet*" }

#VMtools Location
$VMwareToolsExe = "C:\Program Files\VMware\VMware Tools\vmtoolsd.exe"

#vmx parameters Query
$vmxhostname = (& $VMwareToolsExe --cmd "info-get guestinfo.hl.hostname" | Out-String).trim()
$vmxip = (& $VMwareToolsExe --cmd "info-get guestinfo.hl.ipaddress" | Out-String).trim()
$vmxnetmask = (& $VMwareToolsExe --cmd "info-get guestinfo.hl.netmask" | Out-String).trim()
$vmxgateway = (& $VMwareToolsExe --cmd "info-get guestinfo.hl.gateway" | Out-String).trim()
$vmxdns = (& $VMwareToolsExe --cmd "info-get guestinfo.hl.dns" | Out-String).trim()
$vmxnetprefix = Convert-IpAddressToMaskLength $vmxnetmask
We then worked with our Deployment Automation team to modify their VM deployment process to set the VM attributes upon VM creation. It works quite well.
After the Packer build process is done and passes a few tests (fully patched and customizations applied), it is exported via OVFTool and imported to Artifactory. Artifactory sees the new item(s) and replicates them across network boundaries to peer instances based on the global Artifactory configuration.
In Part 3 I’ll show how to query Artifactory for a list of newest OVA images via PowerShell.

Leave a comment