Now that I’ve laid the groundwork for this image pipeline series, let’s get started by setting up our vSphere Content Libraries.
As stated in the overview, we have roughly 40 vCenter servers across multiple sites, multiple data centers within some of these sites, and multiple network boundaries within some data centers. The sites with multiple data centers sharing the same network space have a single storage LUN presented to a “Template” host within each vCenter. In some cases there is up to 15 ESXi hosts connected to the same datastore.
I initially setup a standard Local/Subscribe architecture where each Content Library had its own folder on this single datastore. This setup caused a TON of I/O during synchronizations (read/write of every item to the same datastore). It also caused problems if an update to a Content Library item was taking place at the same time as library synchronization or VM deployments.
I needed a way to speed this up so I moved each Content Library to its own datastore. This helped some but even with All Flash storage it was taking way to long to replicate hundreds of GB every week. The problem is in the data path for replication. It’s going through the ESXi host storage path instead of being able to use VAAI, even if on the same datastore. This is because the datastore is presented to hosts on different vCenter servers and isn’t acceptable for our needs.
As they say, “There’s always a post.” No. Not for that person, but rather William Lam. In this case I stumbled upon his blog post from 2017 on External Replication of Content Libraries. The post talks about using a different tool/technology to replicate Content Library files and configuring the Content Libraries to use JSON Persistence to keep track of the items.
While reading it I wondered if this would work if all of the Content Libraries pointed to the same folder, on the same datastore. Some testing in the lab showed that it works great. This change took replication of an OVA image from roughly 10 minutes per item down to 3 seconds for the ENTIRE Content Library contents. This is because the synchronization is just updating its metadata from the JSON file within the folder.
Prior to PowerCLI 11.5 you would need to use William’s code to apply the JSON Persistent flag to each Content Library and you can follow that process in his blog. This still cannot be done via HTML5 Client but now there is native cmdlets for this within PowerCLI 11.5.
Let’s walk through setting this up. We’ll name each Content Library by appending “CL” to the vCenter name housing it. This way VM deployment automation can easily find them when a request to deploy a VM in that environment is made.
Creating a LOCAL (Publisher) Content Library with JSON Persistent Flag:
$CLdatastore = 'datastore to place CL items'
$vCenter = 'vCenter for LOCAL CL'
New-ContentLibrary -Name ($vCenter + "cl") -Datastore (Get-Datastore $CLdatastore) -Published -PersistJson
Make sure to add -Published so that Subscribed Content Libraries can replicate from it and -PersistJson to create the JSON metadata file.
Once created let’s check its settings to verify JSONPersistence value is set to TRUE.
Get-ContentLibrary -Name ($vCenter + "cl") | Select-Object Name,PersistJson,Datastore

Creating a SUBSCRIBED Content Library using the same datastore:
As shown in William’s post, I need the full datastore path to the Content Library storage folder on the datastore in order to create a JSON Persistent Subscribed Content Library.
There are a couple ways to get this. It can be pulled from the LOCAL content library if you are still connected to that vCenter via PowerShell, as shown in William’s post. The other way is to check for a folder name starting with “contentlib-” on the datastore. I chose this method as our architecture only has a single datastore with a single Content Library folder.
To get the folder path I will mount the target datastore to the local computer, search for the folder name, build the full path to the folder and JSON file, and disconnect the mounted drive.
$CLdatastore = 'datastore to place CL items'
$vCenter = 'vCenter for Subscribed CL'

$ds = Get-Datastore -Name $CLdatastore
New-PSDrive -Name CLPSDS -Location $ds -PSProvider VimDatastore -Root '\' | Out-Null
$CLURI = (Get-Datastore $CLdatastore).ExtensionData.info.url + (Get-ChildItem -Path CLPSDS: contentlib* | Select Name -First 1).name + "/lib.json"
Remove-PSDrive -Name CLPSDS

Now that I have the full path to the Content Library folder, I can create the Subscribed Content Library.
New-ContentLibrary -Name ($vCenter + "cl") -Datastore (Get-Datastore $CLdatastore) -SubscriptionUrl $CLURI -AutomaticSync
Ok. Let’s check to make sure it created properly. I want to make sure it is of type Subscribe, Automatic Sync is set to True, and the Subscription URI is correct.
Get-ContentLibrary -Name ($vCenter + "cl") | Select-Object Name,Type, AutomaticSync, SubscriptionUri | format-list

This all looks good.
Modifying Content Library Replication Schedule:
The last configuration item I change in our environment is the Content Library replication schedule. By default it only replicates at night and every 4 hours. If we have an updated item in the middle of the day I don’t want to wait until the next day.
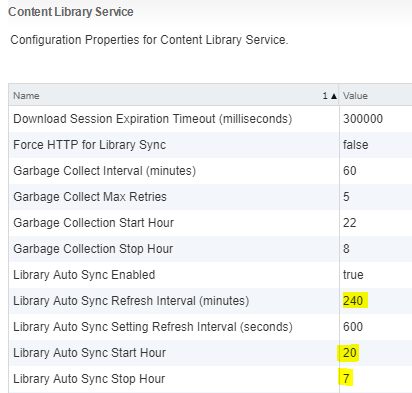
I also don’t want synchronizations to run to often. You will need to modify these items based on your network bandwidth and number of Content Library items (if not using JSON Persistent).
Note: As of this writing I have been unable to figure out how to modify this within the client. I’ve asked VMware but haven’t got a response yet.
Within our primary environments we set synchronizations to every 60 minutes. Here’s how to update these settings:
- Within the FLEX client, navigate to Home and then Administration.
- Click System Configuration
- Click Services and then repeat the next steps for each vCenter in the vCenter domain
- Click Content Library Service <vCenter Name>
- Click edit button in upper-right and modify the following settings:
- Library Auto Sync Refresh Interval (minutes) – set to 60
- Library Auto Sync Start Hour – set to 0
- Library Auto Sync Stop Hour – set to 23
- Click OK

Now that I have all of the Content Libraries created and configured I need to start building OS Images. I’ll cover this in Part 2 of this series.
